|
Part 1: Setting up Photoshop for Square-Pushing
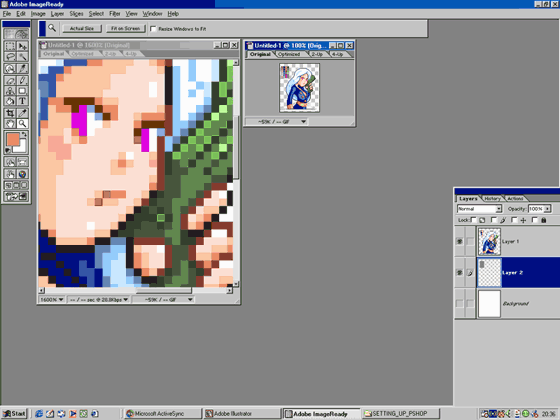
Note: I tend to use Adobe ImageReady for all my pixelart, having used photoshop for years I'm used to Imageready's tools layout and interface. Since Imageready is basically photoshop for low res images it is ideal for pixelart, plus it offers many more undo's without the hassle of photoshops history palette. Remember all pixelart should be created at screen resolution of 72DPI
However you are by no means restricted to ImageReady, Paint Shop Pro, Graphics Gale or even good old MSPaint are all capable pixleart applications only PShop and PSP offer layers which help when creating large illustrations. But if you are just starting out as a pixelartists Microsoft's free with Windows MSPaint will hold it's own admirably. For the this tutorial I will assume you are using Adobe ImageReady.
1: Open ImageReady and create a new document select the Pencil tool (Shortcut 'N') and select the smallest brush size. This brush size represents 1 pixel, all images you see on your computer screen are made up of these single pixels, get to love this tiny square pixel you'll be seeing a lot of it.
2: When creating pixelart you'll be using a zoomed in view most of the time. However it's also very helpful to be able to see what your image looks like at 100% as well. To do this select your new document go to VIEW - NEW VIEW (in new version of Image Ready: Window - Docunments - New window).
3: This will create another view of your already open document, place it to the side of the main document, what ever you now do in the Zoomed in view will be shown in the 100% veiw.
4: If you use any of Imagereadys Marquee tools to draw shapes make sure you turn off the anti aliasing function. Anti Aliasing is a big no-no when doing pixelart, though hand anti-aliasing is used in certain styles of sprite work.
5: It is also helpful to create a palette of colours as you work. As you use a new colour place a small square of this chosen hue in the top left hand side of your document, this is an easy way to keep track of the colours you are using, a quick click of the eye dropper tool and you'll be back working with your chosen colour.
6: Zoom in close to your pixelart, that way you can concentrate on the close up details. Remember you also have the 100% view to one side so can see if your art is looking how your want it at any time. If things don't look quite right it's sometimes the case that your are trying to use to many pixels and being over complicated in too small an area. Pixelart is not like conventional art as you are massively restricted to a limited number of squares with which to create your images. It's sometimes just as important where you do not place a pixel as where you do.

7: If you feel you need a guide to follow when creating your artwork it is possible to pixel over scanned artwork. Scan in your art at 72DPI trying to draw the original as close in size to the final piece, this way you will lose less detail when reducing the image to a suitable pixelart size. Most Videogame sprites are created in multiples of 8, so sizes of 8x8, 16x16, 32x32 and 64x64 are common place in pixelart. Of course, if producing a magazine illustration you are put under no such restrictions.
Contents:
Author of this page had got the permission to host this tutorial here. To have this tutorial on your page you must seek permission from it's author.
|