| |
PIXEL MENU
Author: Nathalie Poitiers
|
This is a very simple tutorial. But I want to show you some tips here. If you are already a 'pixel creator' then just dont read this.
1. Create a new document; RGB; 72 dpi
2. For the background I used #666666.
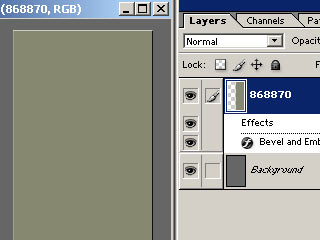
3. On the NEW LAYER use the rectangular marquee tool to make a rectangle of fixed size, width 140 and height 480.
4. Fill it with #868870 color.
5. Double click on this layer to open Layer Style window.
6. Apply Bevel and Emboss.
Style: Inner bevel ;
Technique: smooth;
Depth: 1000% ;
Direction: up;
Size and Soften: 0%;
Angle/Altitude: 120°/30°;
Anti-aliased: unchecked;
Gloss Contour: Linear;
Hoghlight Mode: Normal; white; 75%;
Shadow Mode: Normal; black; 100%.
Contour: checked (use default settings).
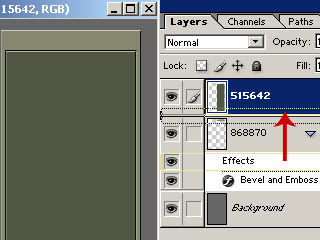
8. On the layer with our rectangle make another rectangle. Use fixed size: width 130px, height 450px. Hit Delete. Don't deselect!
9. Make a new layer, and fill selection with #515642 color. Deselect. Now copy Effects from 1st layer to top layer.
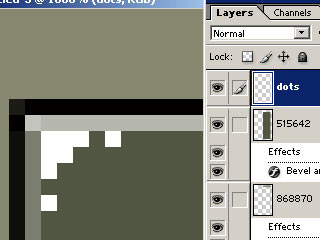
10. Now make new layer again (I've named it "dots"). Zoom your picture (1600%) , with pencil 1px and with white color draw the dots like i have. (Do you see? 8 dots ;) ) Decrease opacity of this layer: 65% is enough.
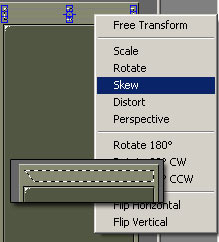
11. Now on the 1st layer make a rectangle selection (use fixed size 130*12 px). Right click to open menu and choose Transform Selection.
12. Right click again to open new menu. Choose "Skew" and transform your selection like i have in the example. Hit "Enter". Don't deselect! Hit "Delete".
13. Now repeat step 9 (on new layer fill selection with #505F62 color and copy Effects from 1st layer to top layer).
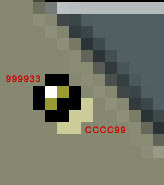
14. Make a new layer. We will make small pixel lamps now. Zoom your picture again and use pencil 1px to draw this "mosaic": please use my colors - black, white, #999933 and #CCCC99.
Please note: When you work with zoom, of course, the navigation is not as comfortable. That's why you should always use two windows! It's Easy: go to menu Window--->Documents---->New Window. So, one window will be the "Actual pixels" view, the second: zoom 1600%.
15. Lets continue. Copy your lamp and move down a bit, colorize the centre (I used #6699cc colour).
16. Draw some crosses in the corner pixel diagonal lines. It's simple but pretty.
17. Insert lines is also very simple: just draw 2 lines black and #727661. Now we are tired, so lets do only copy/move. :) I have copied lines and lamps so many times!
We will get such a nice menu as a result:
|